CodeX Deployment Guide
Enterprise AI Coding Assistant – Complete Deployment Manual
| Resource | URL |
|---|---|
| Official docs | developers.openai.com/codex |
📋 Prerequisites
Complete the Node.js installation and CC-Switch tool installation first.
🎯 Quick Navigation
CodeX is the next-generation intelligent coding assistant built on the GPT-5 architecture, delivering outstanding code generation and optimization for developers.
Deployment path: system environment setup ➜ CLI tool installation ➜ API integration ➜ ready to code
🚀 Quick Setup with CC-Switch (Recommended)
⚠️ Prerequisite
Before configuring CodeX with CC-Switch, make sure the CodeX CLI is globally installed via npm:
npm install -g @openai/codex@latestVerify the installation: codex --version
We recommend using the CC-Switch quick configuration tool for a GUI-based setup that requires no command-line work.
Configuration Steps
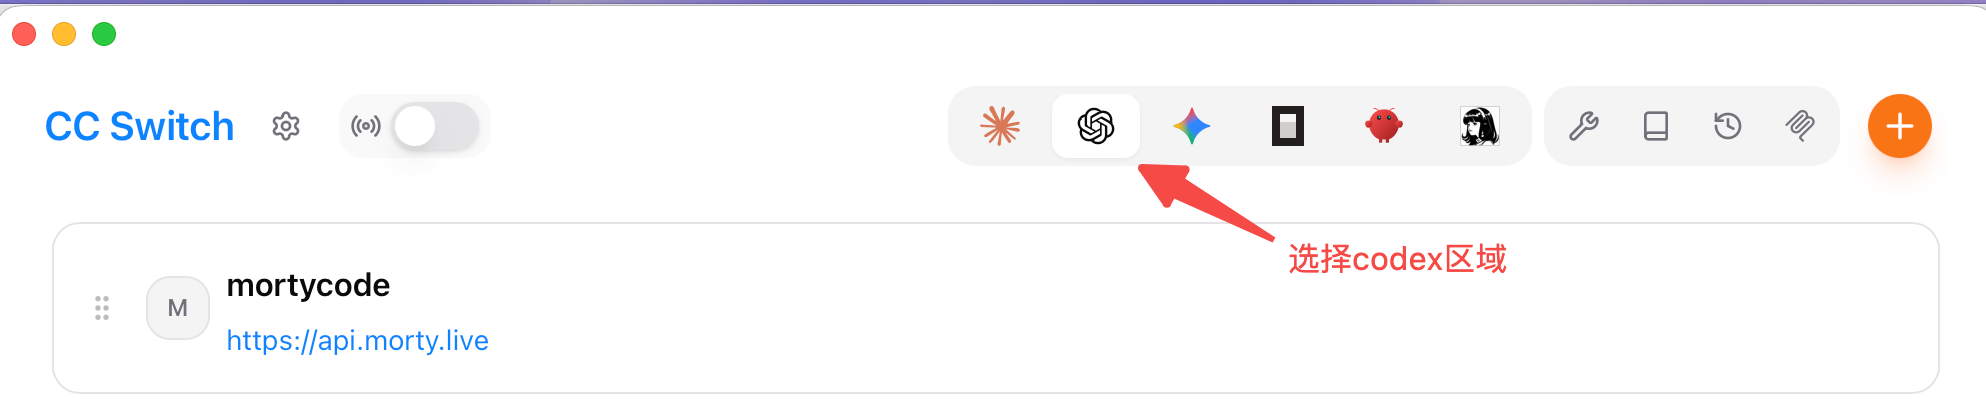
1. Launch CC-Switch and switch to the Codex tab
- Open the CC-Switch app
- Click the Codex tab at the top
- Click the orange + button in the upper-right to add a new configuration
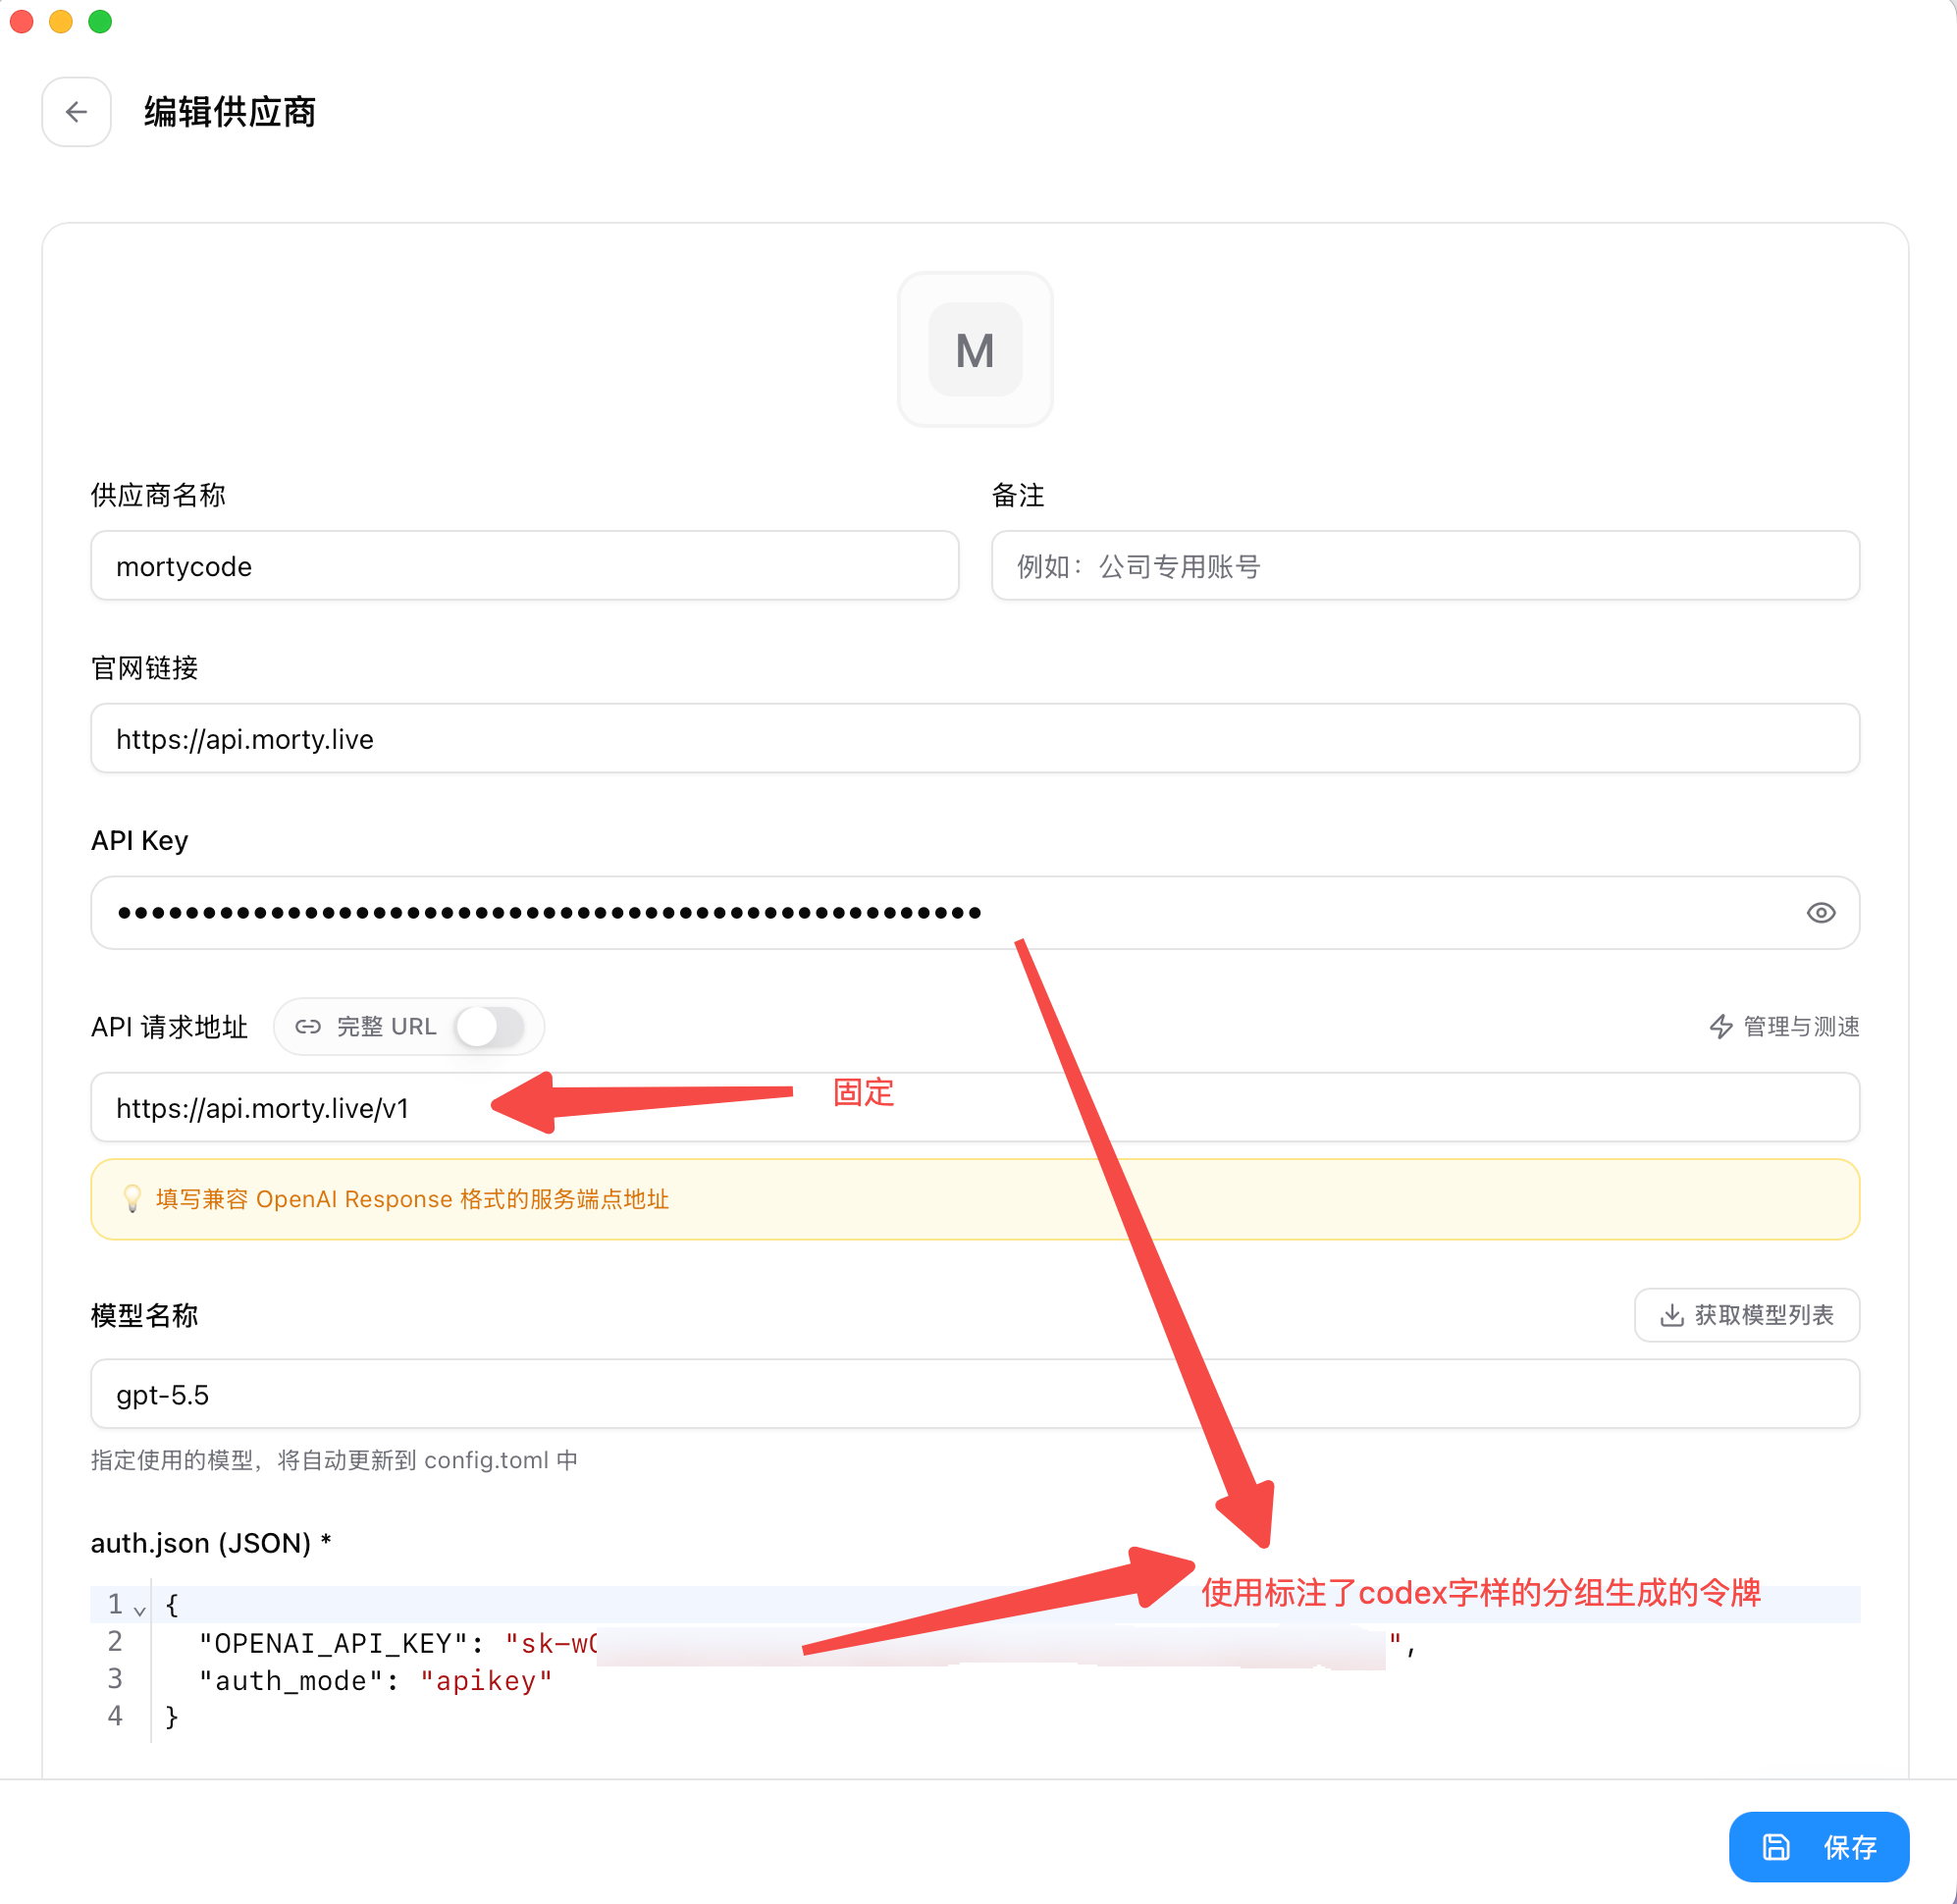
2. Fill in the CodeX provider configuration
- Provider name: any name you like (e.g. "MortyCode")
- Base URL: enter
https://api.morty.live/v1 - API Key: paste the CodeX-specific API Key (from the codex token group) you obtained from the MortyCode platform
- Model: select
gpt-5.4(5.4 is the latest model at the time of writing) - Other options: adjust reasoning effort, network access, and other parameters as needed
- Click Save
💡 Tips
- CC-Switch automatically creates
~/.codex/config.tomlandauth.json - You can add multiple provider configurations and switch at any time
- After switching, close and reopen CodeX for the change to take effect
3. Activate the configuration
- Find the MortyCode entry you just created in the configuration list
- Click the Use button to the right of the entry
- The configuration is marked as Active (green badge)
- Restart CodeX and the new configuration takes effect
4. Quick switching from the system tray
CC-Switch supports quick switching of CodeX configurations from the system tray:
- Right-click the CC-Switch icon in the system tray
- Select the Codex category in the menu
- Pick the configuration you want
- The switch takes effect immediately, no need to open the main window
⚠️ Notes
- Make sure to create the API Key in the "codex" token group on the MortyCode platform
- CodeX API Keys and Claude Code API Keys are not interchangeable
- After switching configurations, restart CodeX for the change to take effect
- You can test API endpoint speed inside CC-Switch
⌨️ Manual Command-Line Setup
If you prefer not to use CC-Switch, follow the steps below to configure CodeX manually.
🖥️ Windows
Step 1: Install the CodeX CLI
Open Command Prompt or PowerShell as Administrator and run:
npm install -g @openai/codex@latest
codex --versionStep 2: Integrate the MortyCode API service
Get your API credentials:
- Visit the MortyCode developer console
- Sign up or log in
- Navigate to the API Key management section
- When creating a new key, be sure to select the codex token group
- Save the generated API Key securely
🔐 Security reminder
CodeX requires a dedicated token group and is fully isolated from the Claude Code token system.
Create the configuration directory:
mkdir %USERPROFILE%\.codex
cd %USERPROFILE%\.codexCreate the configuration file: config.toml
model_provider = "MortyCode"
model = "gpt-5.4"
model_reasoning_effort = "xhigh"
disable_response_storage = true
approval_policy = "on-request"
sandbox_mode = "danger-full-access"
model_supports_reasoning_summaries = true

[model_providers.MortyCode]
name = "morty"
base_url = "https://api.morty.live/v1"
wire_api = "responses"
requires_openai_auth = trueCreate the auth file: auth.json
{
  "OPENAI_API_KEY": "Paste your CodeX-specific API Key here"
}Step 3: Initialize a workspace
mkdir my-codex-project
cd my-codex-project
codex🍏 macOS
Install the CodeX CLI
npm install -g @openai/codex@latest
codex --versionIntegrate the API service
Create the configuration directory:
mkdir -p ~/.codex
cd ~/.codexCreate config.toml:
cat > config.toml << 'EOF'
model_provider = "MortyCode"
model = "gpt-5.4"
model_reasoning_effort = "xhigh"
disable_response_storage = true
approval_policy = "on-request"
sandbox_mode = "danger-full-access"
model_supports_reasoning_summaries = true

[model_providers.MortyCode]
name = "morty"
base_url = "https://api.morty.live/v1"
wire_api = "responses"
requires_openai_auth = true
EOFCreate auth.json:
cat > auth.json << 'EOF'
{
  "OPENAI_API_KEY": "Paste your CodeX-specific API Key here"
}
EOFInitialize a workspace
mkdir my-codex-project
cd my-codex-project
codex🐧 Linux
Install the CodeX CLI
sudo npm install -g @openai/codex@latest
codex --versionIntegrate the API service
Create the configuration directory:
mkdir -p ~/.codex
cd ~/.codexCreate config.toml:
cat > config.toml << 'EOF'
model_provider = "MortyCode"
model = "gpt-5.4"
model_reasoning_effort = "xhigh"
disable_response_storage = true
approval_policy = "on-request"
sandbox_mode = "danger-full-access"
model_supports_reasoning_summaries = true

[model_providers.MortyCode]
name = "morty"
base_url = "https://api.morty.live/v1"
wire_api = "responses"
requires_openai_auth = true
EOFCreate auth.json:
cat > auth.json << 'EOF'
{
  "OPENAI_API_KEY": "Paste your CodeX-specific API Key here"
}
EOFInitialize a workspace
mkdir my-codex-project
cd my-codex-project
codexFAQ
Are CodeX and Claude Code API Keys interchangeable?
No, they use different token groups:
- Claude Code: uses the Claude Code token group
- CodeX: uses the "codex" token group
Create the matching dedicated API Key on the MortyCode platform.
Where are the configuration files stored?
- Windows:
%USERPROFILE%\.codex\ - macOS/Linux:
~/.codex/
More questions
See the FAQ or contact after-sales support.