Claude Code Deployment Guide
| Resource | URL |
|---|---|
| Official docs | docs.claude.com |
📋 Prerequisites
Complete the Node.js installation first and make sure Node.js 18+ is properly installed.
⚡ First-Time Install Must-Read: Skip the Initialization Error
When using an API relay, Claude Code throws the following error on its first launch:

Welcome to Claude Code
Unable to connect to Anthropic services
Failed to connect to api.anthropic.com: ERR_BAD_REQUESTThis happens because Claude Code tries to reach the official API for an initialization check on first launch, and an API relay cannot complete that step. After installation but before the first launch, use one of the methods below to skip it:
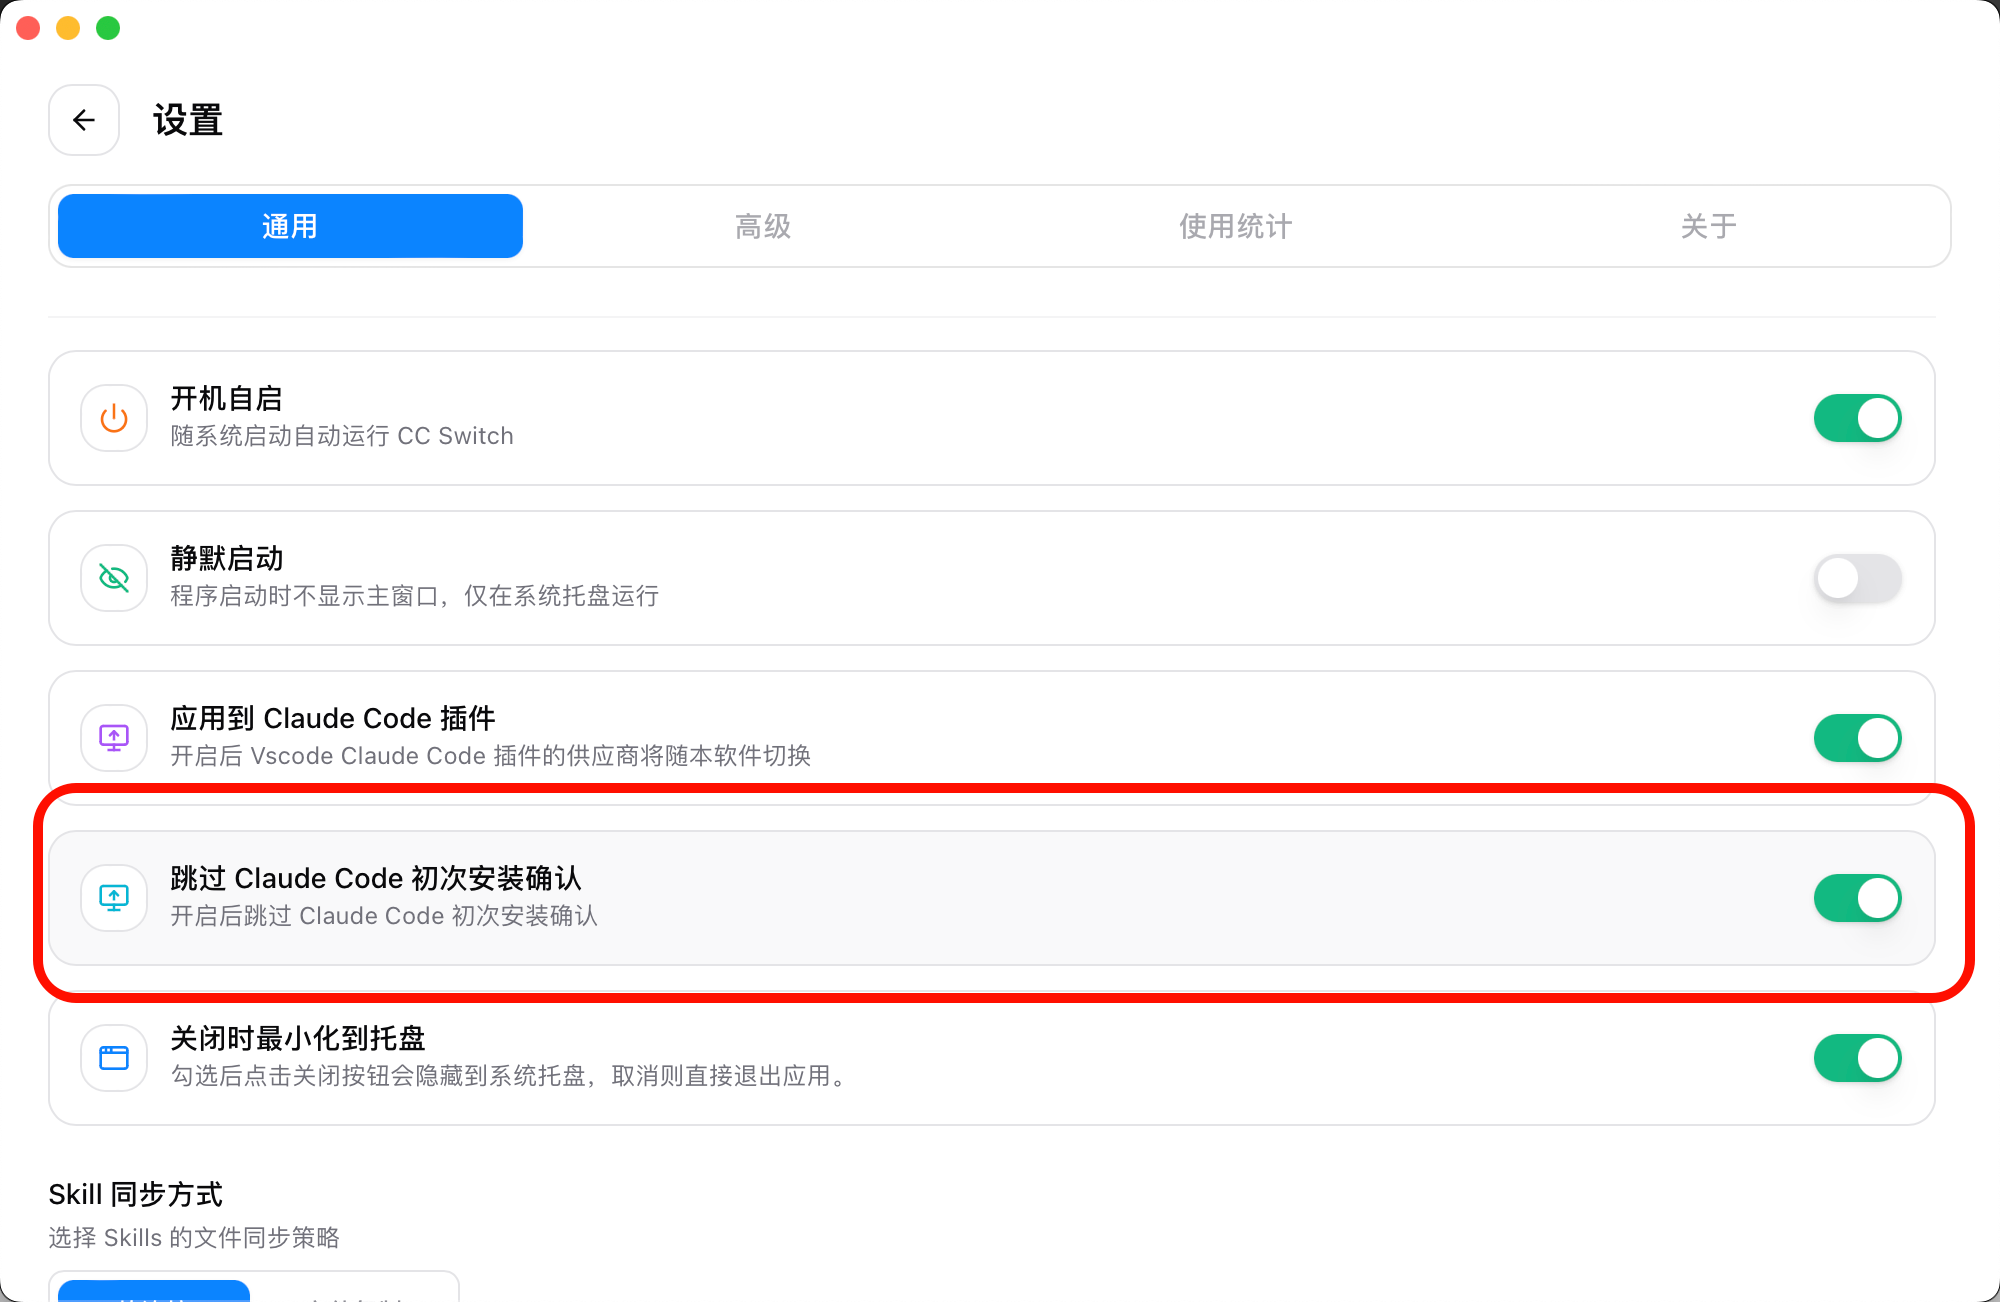
Method 1: Skip with CC-Switch (recommended)
Open the CC-Switch configuration tool, go to Settings → General, and enable the "Skip Claude Code first-launch confirmation" option.
Method 2: Edit the configuration file manually
Find the ~/.claude.json file in your home directory and append "hasCompletedOnboarding": true at the end:
⚠️ Mind the JSON format
Before adding the new field, add an English comma to the end of the previous field, otherwise a JSON syntax error will prevent Claude Code from starting.
{
  "installMethod": "unknown",
  "autoUpdates": true,
  "firstStartTime": "2025-07-14T06:11:03.877Z",
  "userID": "xxxx",
  "projects": {
    "/home/your-user": {
      "allowedTools": [],
      "history": [],
      "mcpContextUris": [],
      "mcpServers": {},
      "enabledMcpjsonServers": [],
      "disabledMcpjsonServers": [],
      "hasTrustDialogAccepted": false,
      "projectOnboardingSeenCount": 0,
      "hasClaudeMdExternalIncludesApproved": false,
      "hasClaudeMdExternalIncludesWarningShown": false
    }
  },  // Add an English comma here
  "hasCompletedOnboarding": true  // Add this new field
}Save the changes and run claude again to use it normally.
Reference: Skipping Claude Code initialization
🚀 Quick Setup with CC-Switch (Recommended)
If you have installed the CC-Switch quick configuration tool, you can manage Claude Code through a GUI without manually editing configuration files or environment variables.
Why CC-Switch
- Intuitive graphical interface
- One-click switching between provider configurations
- Automatic management of environment variables and config files
- Configuration backup and restore
- Switch configurations without restarting your terminal
Configuration Steps
1. Launch CC-Switch and add a Claude Code configuration
- Open the CC-Switch app
- Click the Claude tab at the top
- Click the orange + button in the upper-right to add a new configuration
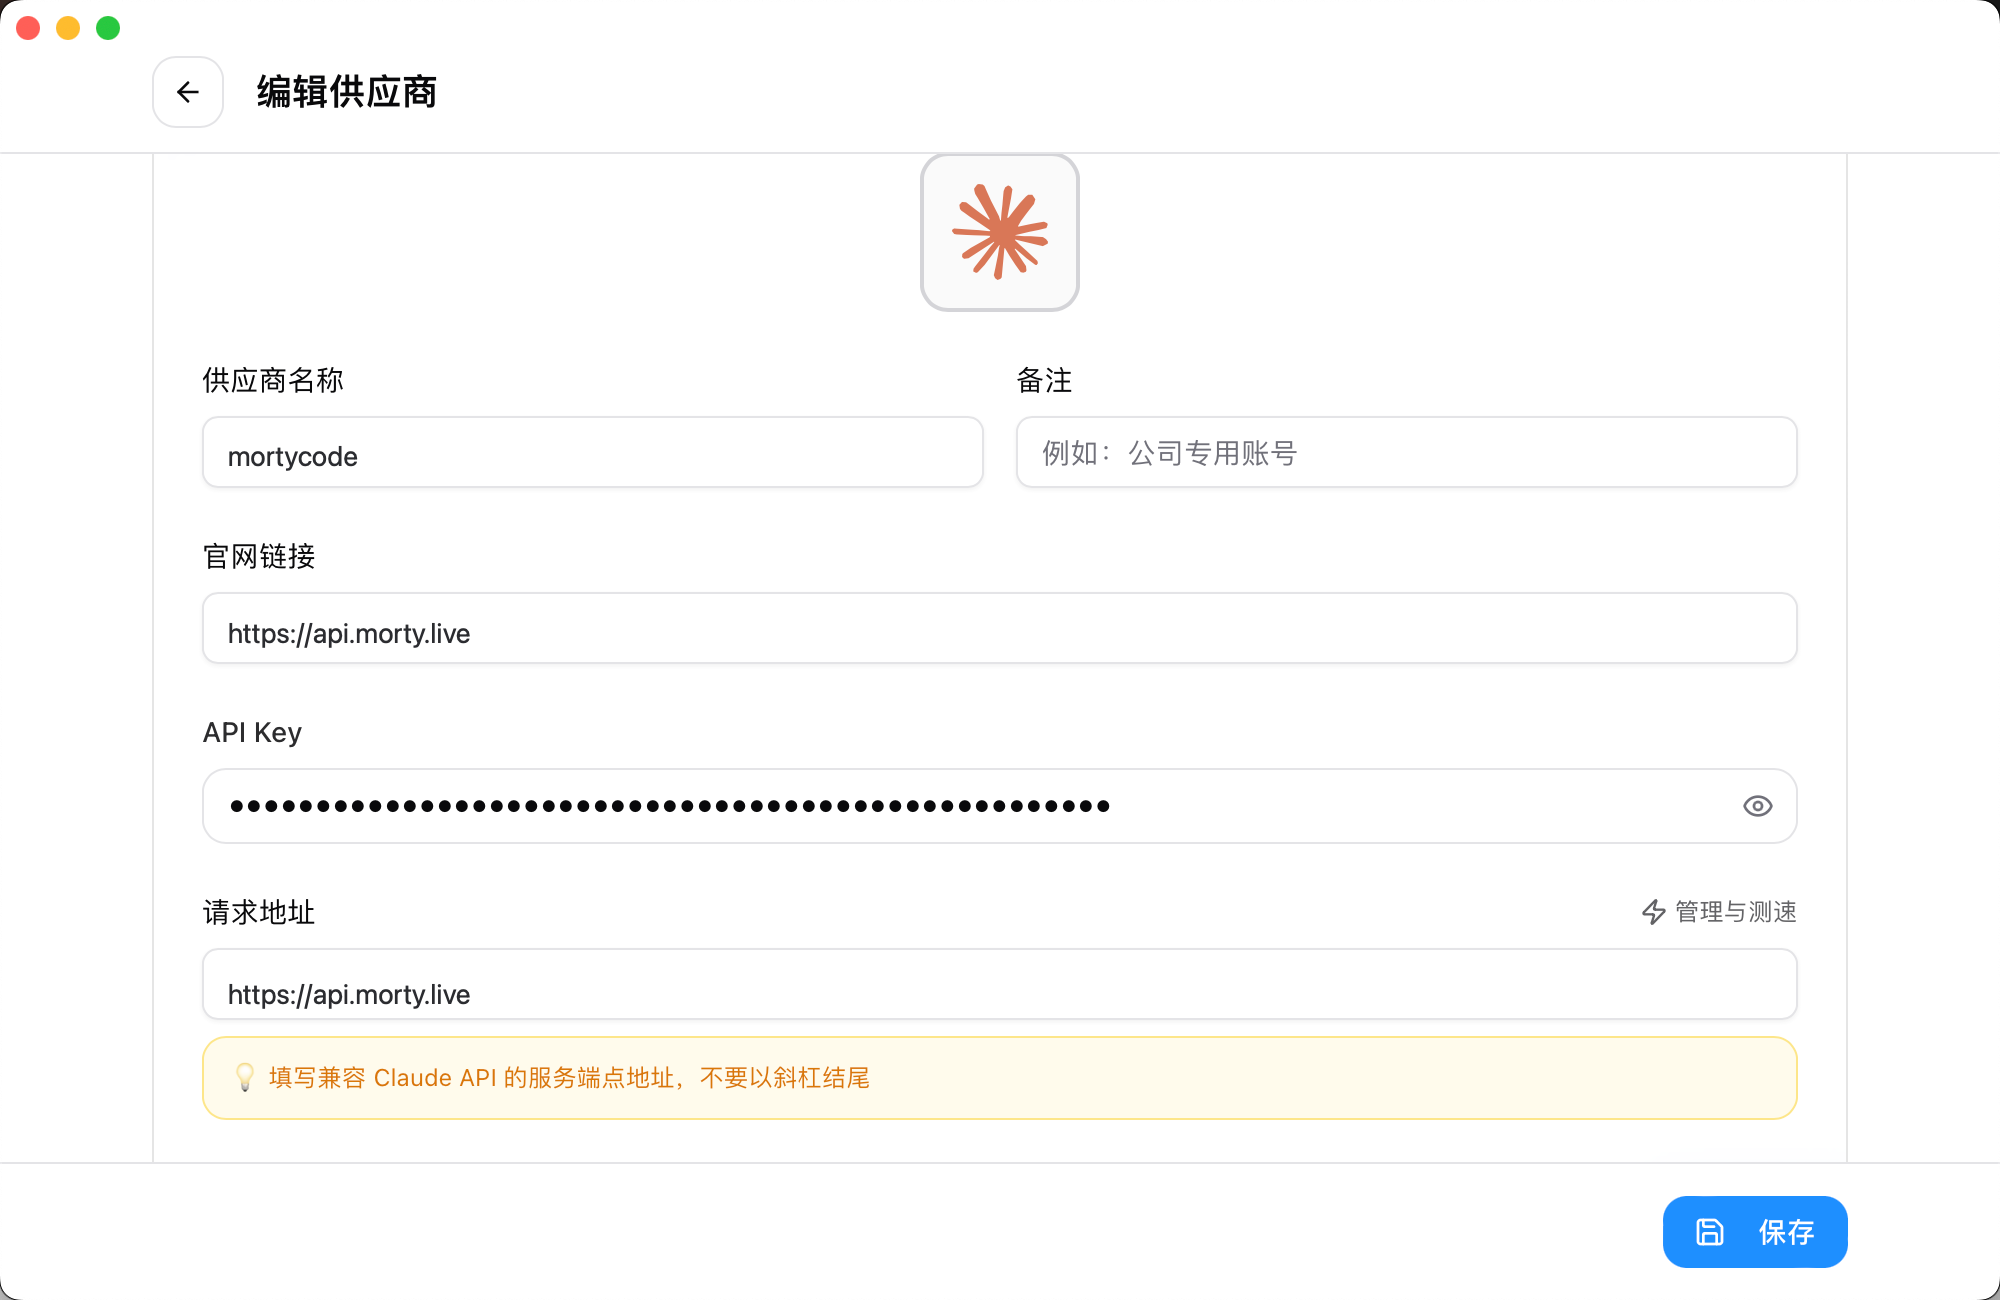
2. Fill in the provider details
- Provider name: any name you like (e.g. "mortycode")
- API Base URL: enter
https://api.morty.live - API Key: paste the Claude-specific API Key you obtained from the MortyCode platform
- Model: pick an available Claude model that fits your needs
- Click Save
💡 Tips
- You can add multiple provider configurations (e.g. official, mortycode, etc.)
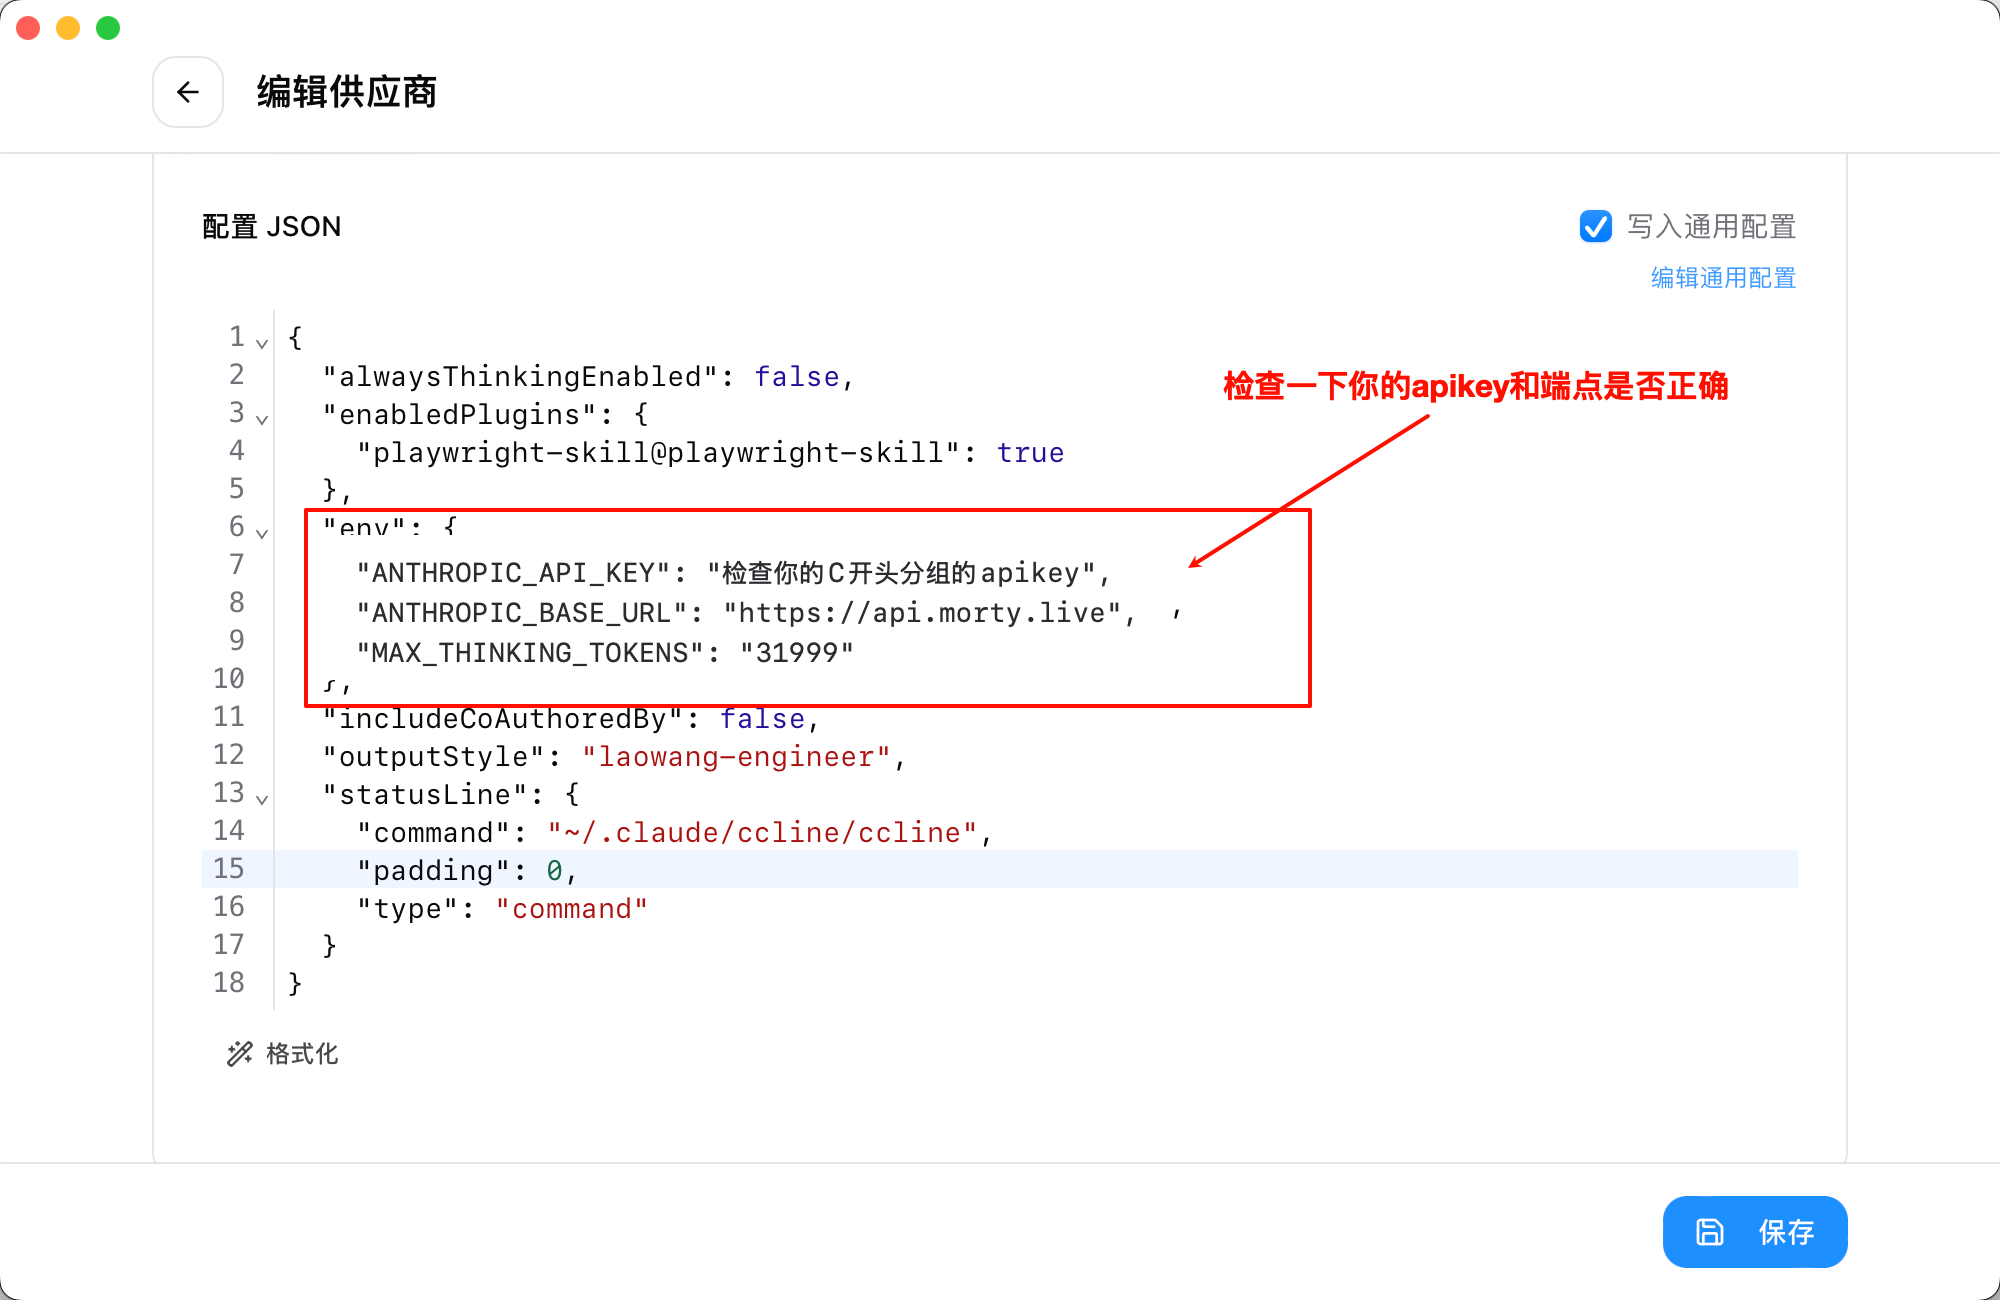
- CC-Switch automatically updates the
~/.claude/settings.jsonconfiguration file - After switching, close and reopen Claude Code for the change to take effect
3. Activate the configuration
- Find the mortycode entry you just created in the configuration list
- Click the Use button to the right of the entry (or click the card itself)
- The configuration is marked as Active (green badge)
- Restart Claude Code and the new configuration takes effect
4. Quick switching from the system tray
CC-Switch supports quick switching from the system tray:
- Right-click the CC-Switch icon in the system tray
- Select the Claude category in the menu
- Pick the configuration you want
- The switch takes effect immediately, no need to open the main window
⚠️ Notes
- Make sure the API Key you created on the MortyCode platform is in the Claude Code token group
- After switching configurations, restart Claude Code for the change to take effect
- You can test API endpoint speed in CC-Switch and pick the fastest one
⌨️ Manual Command-Line Setup
If you prefer not to use CC-Switch, you can configure Claude Code from the command line.
🖥️ Windows
System requirements
Windows 10, 11
Installation
Method 1: Native Install (recommended)
PowerShell:
irm https://claude.ai/install.ps1 | iexCMD:
curl -fsSL https://claude.ai/install.cmd -o install.cmd && install.cmd && del install.cmdMethod 2: NPM install (not recommended)
⚠️ npm install is not recommended
The npm channel lags behind and ships older versions. Prefer the Native methods above.
npm install -g @anthropic-ai/claude-codeVerify the installation:
claude --versionConfigure environment variables
PowerShell:
[Environment]::SetEnvironmentVariable("ANTHROPIC_AUTH_TOKEN", "sk-xxx", "User")
[Environment]::SetEnvironmentVariable("ANTHROPIC_BASE_URL", "https://api.morty.live", "User")CMD:
setx ANTHROPIC_AUTH_TOKEN "sk-xxx"
setx ANTHROPIC_BASE_URL "https://api.morty.live"💡 Tip
Replace sk-xxx with your own API Key! Restart your terminal after setting the variables so the changes take effect.
- Launch Claude
In a terminal, cd into a project directory (or any directory) and run claude to start.
🍏 macOS
System requirements
macOS 10.15 (Catalina) or later
Installation
Method 1: Homebrew (recommended)
brew install --cask claude-codeMethod 2: Curl script
curl -fsSL https://claude.ai/install.sh | bashMethod 3: NPM install (not recommended)
⚠️ npm install is not recommended
The npm channel lags behind and ships older versions. Prefer the Native methods above.
npm install -g @anthropic-ai/claude-codeVerify the installation
claude -vYou should see something like: 1.0.108 (Claude Code)
Configure environment variables
echo 'export ANTHROPIC_AUTH_TOKEN="sk-xxx"' >> ~/.bash_profile
echo 'export ANTHROPIC_BASE_URL="https://api.morty.live"' >> ~/.bash_profile
source ~/.bash_profile💡 Tip
Replace sk-xxx with your own API Key!
Restart your terminal and launch Claude
After restarting your terminal, cd into a project directory (or any directory) and run claude to start.
🐧 Linux
System requirements
Linux distribution (Ubuntu 18.04+, CentOS 7+, Debian 9+, etc.)
Installation
Method 1: Curl script (recommended)
curl -fsSL https://claude.ai/install.sh | bashMethod 2: NPM install (not recommended)
⚠️ npm install is not recommended
The npm channel lags behind and ships older versions. Prefer the Native methods above.
npm install -g @anthropic-ai/claude-codeVerify the installation
claude -vConfigure environment variables
Ubuntu/Debian (Bash)
echo 'export ANTHROPIC_AUTH_TOKEN="sk-xxx"' >> ~/.bash_profile
echo 'export ANTHROPIC_BASE_URL="https://api.morty.live"' >> ~/.bash_profile
source ~/.bash_profileFedora/CentOS (Zsh)
echo 'export ANTHROPIC_AUTH_TOKEN="sk-xxx"' >> ~/.zshrc
echo 'export ANTHROPIC_BASE_URL="https://api.morty.live"' >> ~/.zshrc
source ~/.zshrc💡 Tip
Replace sk-xxx with your own API Key!
Restart your terminal and launch Claude
After restarting your terminal, cd into a project directory (or any directory) and run claude to start.
FAQ
Command not found?
- Confirm Claude Code is installed correctly
- Check your PATH environment variable
- Restart the terminal window
Connection failures?
- Check your network connection
- Confirm the API Key is correct
- Check that your balance is sufficient
More questions
See the FAQ or contact after-sales support.